


Let us Learn about a Screw-Retained Crown
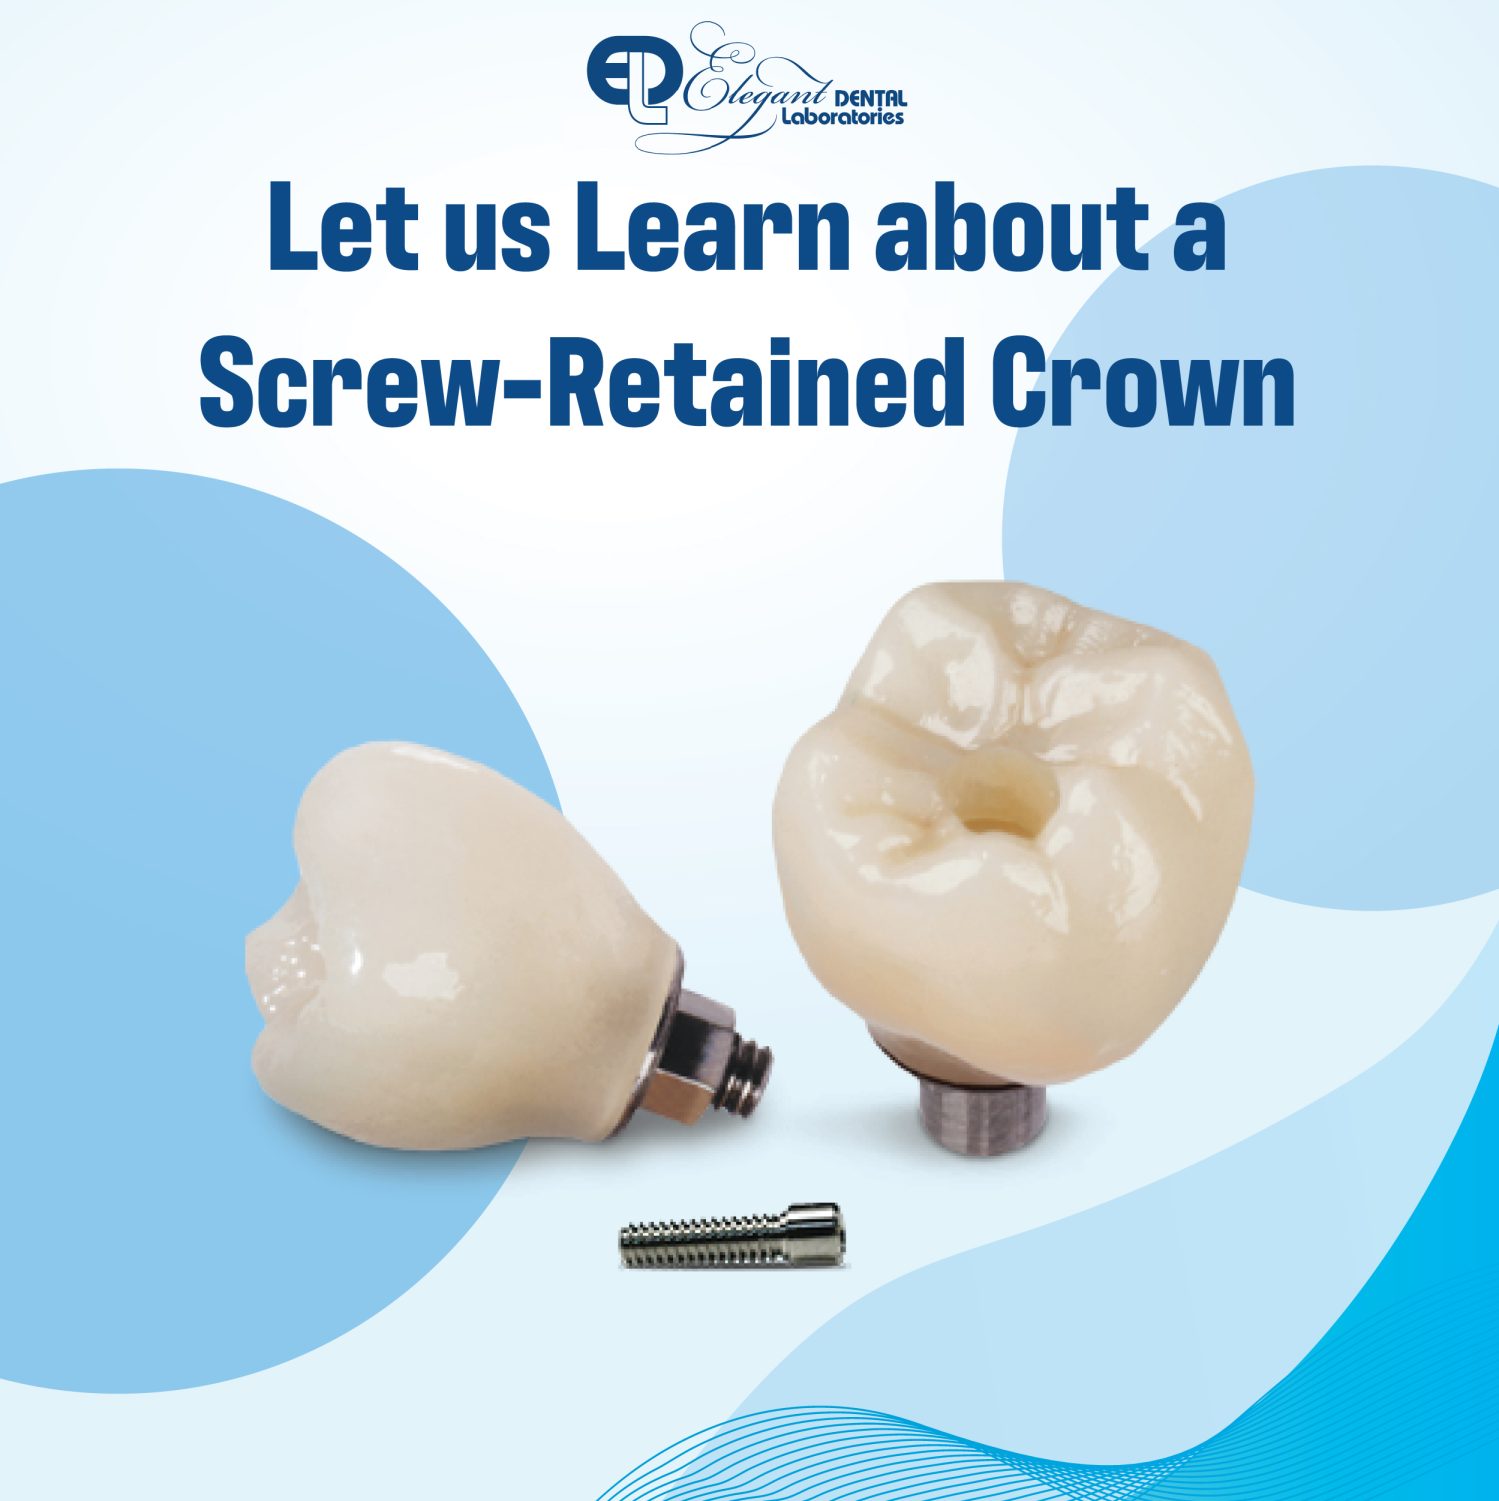
Screw-Retainted Crown
Most implant dentists are concerned with providing their patients with a long-lasting and reliable restoration. However, the long-term success of a crown can depend on a number of different biological components and material related factors. One of the main decisions a clinician will need to make is whether to use a screw-retained implant crown or to use a cement-retained restoration. Scientific studies have not produced conclusive data supporting one type of restoration over the other so the choice is largely down to personal preference and whether screw access is favorable.
Advantages of Using a Screw-Retained Crown
Screw-retained restorations are popular due to the easy retrievability of the crown and, of course, there is no need to use dental cement. Using a cement-free restoration eliminates the risk of leaving cement sub-gingivally. It can often be difficult to ensure any excess cement is completely removed which could otherwise increase the risk of peri-implantitis. Additionally, it can be nice to have the option to easily re-tighten an implant screw or to remove an implant crown if problems occur. Retrievability could be particularly beneficial where hygiene is a concern as the implant crown can be easily removed and thoroughly cleaned before being replaced.Generally, it can be advantageous to use a screw retained implant crown when restoring posterior teeth, especially upper posterior teeth. Screw retained implant crowns can also be useful when restoring more complex implant cases.
Planning Implant Placement for a Screw-Retained Crown
If using a screw-retained implant crown is an option, then it is necessary to make this decision prior to placing the implant. This ensures the implant can be correctly oriented so that the implant screw will exit in the right location. Ideally, screw access should be available in the central fossa of a molar or bicuspid or on the palatal surface of an anterior crown. With posterior implants, this doesn’t usually cause a problem but it may be more of a concern with anterior implants and where the screw access hole must exit palatally. It is possible that the anatomy of the hard tissues may not allow this to happen.
Seating a Screw-Retained Crown
There are various techniques that can be used to seat a screw-retained implant crown but most dentists choose to use composite resin. Prior to seating the crown, some dentists prefer to gently roughen the surface around the screw hole using light air abrasion or a diamond bur, before etching and cleaning the area. Ideally, a new screw will be provided for seating the restoration but if the lab screw is to be used then it must be thoroughly cleaned prior to fitting. Once the restoration has been seated and the screw is correctly torqued, it can be advisable to cover up the screw head to avoid getting composite directly on the screw. The access channel can then be covered with composite.
Possible Disadvantages of Using a Screw-Retained Crown
One possible disadvantage of using this type of restoration is that the presence of occlusal access for the screw will interfere with the morphology of the crown. The screw access hole must be closed with composite resin and this could impair the final esthetic outcome especially where a metal-based framework is used. One way to get around this problem is to use an opaque composite to help mask the metal followed by body colored and enamel colored composite resins. However, choosing a zirconia crown eliminates this disadvantage, allowing an aesthetically pleasing closure of the screw access channel to easily be achieved with conventional composite resin.
Using a Digital Scan for a Screw-Retained Crown
Let us consider a situation where a screw-retained implant restoration is recommended. If the final implant abutment is already seated, the abutment itself can be scanned, as opposed to removing the abutment and utilizing a scan body. This type of digital impression technique is similar to scanning a tooth preparation for a crown.
When taking a digital impression at a site where an abutment is seated, it is important to capture the margins of the abutment. Ideally, the margins of the abutment are situated at or 0.5 mm below the gingival margin, allowing for a more predictable cement cleanup. A custom abutment allows the lab technician to ideally place the margins, and with the abutment margin located close to the gingival margin, the intraoral scanning process is easier.
If the margins of the abutment are covered by the gingiva, then the soft tissue must be retracted to expose the margins. Otherwise, it will be difficult for the dental lab to create an accurate implant crown. To expose subgingival margins, gently place cord to retract the tissue before the implant site is scanned. After five minutes, remove the retraction cord and immediately scan the implant site. This allows for the creation of digital impressions where the margins are easily identified by both the dental lab and the CAD software used to create crowns. Before digitally submitting the case to the lab, it is important to inspect the post-processing scan to ensure the margin, the body of the abutment, and the adjacent contacts are clear and clean. This ensures the lab has the information needed to create a well-fitting, functional implant restoration.